Insert headers and footers
To add a new header or footer to your document or edit one that already exists,
-
switch to the Insert tab of the top toolbar,
-
click the
 Header/Footer icon on the top toolbar,
 -
select one of the following options:
-
Edit Header to insert or edit the header text.
-
Edit Footer to insert or edit the footer text.
-
change the current parameters for headers or footers on the right sidebar:
-
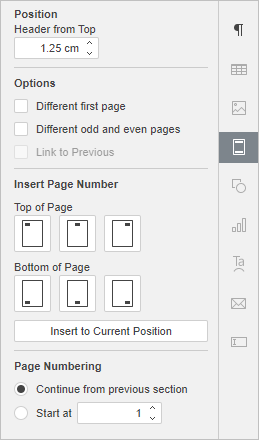
Set the Position of the text: to the top for headers or to the bottom for footers.
-
Check the Different first page box to apply a different header or footer to the very first page or in case you don't want to add any header/ footer to it at all.
-
Use the Different odd and even pages box to add different headers/footer for odd and even pages.
-
The Link to Previous option is available in case you've previously added sections into your document. If not, it will be grayed out. Moreover, this option is also unavailable for the very first section (i.e. when a header or footer that belongs to the first section is selected). By default, this box is checked, so that the same headers/footers are applied to all the sections. If you select a header or footer area, you will see that the area is marked with the Same as Previous label. Uncheck the Link to Previous box to use different headers/footers for each section of the document. The Same as Previous label will no longer be displayed.

To enter a text or edit the already entered text and adjust the header or footer settings, you can also double-click anywhere on the top or bottom margin of your document or click with the right mouse button there and select the only menu option - Edit Header or Edit Footer.
To switch to the document body, double-click within the working area. The text you use as a header or footer will be displayed in gray.

